Pages

Monday, July 20, 2015

PAINTING A BREAKFAST NOOK

Hey, hey, hey!  I’ve been doing more home improvement projects than I’ve written about!  In all honesty, I’ve been hung up on 1. time and 2. search engine optimization, but I’ve decided to say “screw it” and just write, or rather photo dump all the pictures I’ve taken of the City Hood Home projects.  Today’s photo dump is of painting the breakfast nook.  Let’s look at what the breakfast nook looked like when we moved in:

 
Back in December, I painted the wainscoting:
 
 
Once I had the wainscoting done, it was time to paint the walls… and the dreaded ceiling.

PAINTING A BREAKFAST NOOK WALLS

 
From the picture above, you can see the walls were a fairly neutral beige.  It’s a safe color when selling a house, but I wanted something a little crisper, so I decided to go with Benjamin Moore Moonshine, using their Ultra Spec paint line.  It’s a barely-there gray and I love it.  The Ultra Spec paint line is a low-splatter paint, so it’s great if you are lazy about putting a drop-cloth down, like me! ;)


I did two coats along with a couple of touch-up spots here and there, but for the most part, the process was pretty straight-forward.


Once the walls were done, I decided that the ceilings were more off-white than white and since I was going for the crisp, clean look, I decided to paint the ceilings too.

PAINTING A BREAKFAST NOOK CEILING

 
After debating the zillion shades of white, I landed on Benjamin Moore Decorator’s White.  I really didn’t have any main draw to this shade versus the other shades of white, other than I read good reviews about this particular shade.  Honestly, I don’t know if I would have been able to tell the difference from all the shades of white other than they were more pure white than what was currently on the ceilings.

 
FYI, painting ceilings sucks.  I actually like to paint.  I find it rather relaxing and really rewarding, but ugh, I can’t say I feel that way when it comes to the ceilings.  It’s flat-out uncomfortable.  I even had the roller on a long pole, but I still have to arch my neck up and dig the pole into my hip for leverage and pressure.  I’m not really looking forward to painting the ceilings in the rest of the house, but I know once it’s done, I’ll be so happy.  If anyone has any good tips for painting the ceilings, I’d LOVE to hear them!!


I unscrewed the faceplate of our pendent light over the table so I could cover every possible inch while painting the breakfast nook ceiling.

 
Can you see the difference?  Before I took the tape off, Nick thought I was painting the ceilings the same color as the walls.  I assured him that they were in fact two totally different colors.
 

HARD WORK PAYS OFF WHEN PAINTING A BREAKFAST NOOK

 
Yay!  The breakfast nook is “done”!  At least with the painting…. for now… until I decide to change my mind and redo it all. But for now, I’m still in love with the change, so Moonshine and Decorator’s White will be sticking around for a little while.

 
See, the ceiling and walls ARE different colors!
 
 
I think it looks a thousand times better than the painted-to-sell shade of beige!
 
 
What do you think?

LESSONS LEARNED FROM PAINTING A BREAKFAST NOOK

 
Before I go, I wanted to share one quick lesson I learned from painting the breakfast nook:
Paint the ceiling BEFORE you paint the walls!  I find it a lot easier to paint the walls versus the ceiling and with that, I also found that I made more mishaps with the ceiling.  In other words, I ended up painting the walls the ceiling color at certain points (drips through the tape, me just being careless and I carried the roller on a pole around the room).  Since I painted the walls first, I had to go back after painting the ceiling and re-touch-up the walls.  Moving forward, I’ve learned my lesson and will be painting the ceilings first, that way if I have any mishaps, I’ll be painting over the walls in the next step anyway, so I’m spared the re-touch-up step.  I don’t know if that will work for you, but I know it will help me as I move forward.
Happy painting everyone!

Wednesday, July 8, 2015

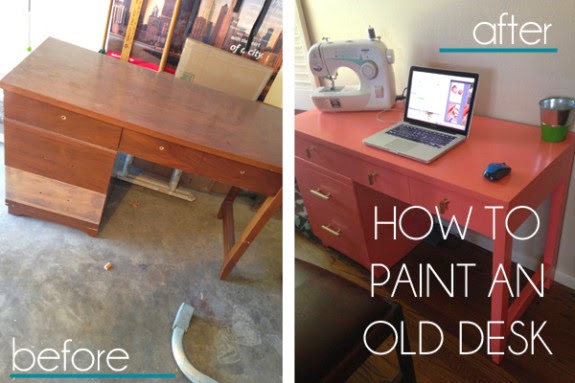
PAINT OLD FURNITURE; A CRAIGSLIST DESK MAKEOVER


Nick and I went from a 700 square foot condo to a 1500 square foot house.  In doubling our square footage, we sure had a lot of furniture voids.  One of those voids happened to be a desk for me.  Trying to pinch our pennies, we’ve spent a lot of time on Craigslist as a means to fulfill our furniture needs.  I stumbled across the perfect desk… old, wooden, and $30.  All the while, I had this desk over at Sarah M. Dorsey Designs as my inspiration and I couldn’t wait to dive in, transforming my own desk.


I realized after I sanded one drawer down that I didn’t have any before pictures.  Oops!


The original hardware.
The hardware after I removed it from the drawers

I sanded the heck out of the desk, removing almost all of the original stain with our random orbit sander and medium-grit sand paper.  My arm felt wobbly for days afterward.  (Okay, I’m exaggerating a little bit, but this definitely fatigued my hand and arm!)  After doing so much sanding, I learned that I didn’t need to strip it down as much as I had since I would be painting the desk instead of staining it.  If you plan on staining any wood furniture, you’ll want to remove all of the existing stain by sanding it down to the bare wood.  If you are painting wood furniture, a good once-over with an electric sander will rough up the stain enough to give the primer and paint something to stick to.  (Just one of the lessons I learned.)


Once I had the desk completely sanded down, I used liquid deglosser to clean off the sanding debris.  This is a step you can actually do in the beginning before you sand to reduce the amount of sanding needed (if any), but I did it after I sanded to help clear off the saw dust, as I just mentioned.  Either way, I think is fine, but I’ll let you know if I learn something different!

The next step is to prime your furniture.  I used Kilz Original Low Odor, which is an oil based primer.  On the plus side, the oil-based primer is going to stick to the surface really well.  On the down side, oil-based primer is a pain to clean up (aka, if you get any on you, it will likely be on your for 4 or 5 days before it completely washes off) and it isn’t particularly great at self leveling.  In other words, you will see the brush strokes like crazy!  After painting my desk, I have since switch primers to Insl-x Stix primer, which is an acrylic-urethane primer.  Stix (for short) cleans up with water and is self leveling.  While it costs twice as muck as the Kilz, I think it is well worth the cost!

If you use an oil-based primer, I definitely recommend sanding your desk down (and more specifically, I’d recommend using an electric sander with a fine-grit sand paper) once the primer dries.  Be sure to check your can of primer for drying time!  I hand-sanded the primer on my desk and went straight into painting and then very quickly regretted not using the electric sander instead.  The brush strokes from the primer didn’t go away as much as I wanted.    Once you do a light sanding to remove any excess brush strokes, use a microfiber cloth to clean off the dust.

Now comes the fun part!!  Painting!  I decided to use the same color as my inspiration desk, Behr’s Cool Lava, for the exterior, however, instead of using Behr paint, I choseBenjamin Moore Advance in High Gloss.  Inside the drawers, I used Benjamin Moore White Dove.


I’m typically a rather frugal person, but I quickly learned that using high-quality paint is TOTALLY worth the extra money.  I don’t have experience with Sherwin Williams or other high-end paints, so I can’t really comment there as of yet, but from my experience with Benjamin Moore, the paint levels out really nicely and creates a durable, superior finish.  The Advance line is specifically made for woodwork, so it’s perfect for a desk.  Some other spots in the house where  you might consider using Benjamin Moore Advance paint include trim, doors, and cabinetry.

You have to be a bit patient with Benjamin Moore Advance since it requires 16 hours of drying time in between each coat!  Talk about torture!  But good things come to those who wait, right?!  A small foam roller is great for applying the paint in this sort of application.  You will see little air bubbles from the foam roller right as you apply the paint, but if you use a good quality paint, those will level themselves right now.


I did two coats of paint on my desk and let it rest for a few days before moving onto the finishing touches… the hardware.  (Actually, it was mostly waiting for my hardware to arrive in the mail.)

So the hardware… I wasn’t a huge fan of the hardware that was originally on the desk.  I really liked the look of the brass hardware on my inspiration desk and then I saw this kitchen redesign over on One Kings Lane.  Oh man, I had to have those Lewis Dolin Bar pulls and knobs!  Well, lo and behold, those awesome pulls and knobs in brass were on back order… everywhere.   I contacted Mr. Dolin himself and he confirmed that I wasn’t going to be able to find them in stores or online for two and a half more weeks.  Ugh, the torture!  I ended up placing my order online and let the days tick by, but be sure, I was checking the status of my order every day to see if, by chance, they shipped out early.  No dice.  They finally arrived and I screwed them in that same day to finish out my desk.

The brush marks from the primer are driving me crazy, so I plan to do a quick sanding on the top of the desk down and repainting it with the Cool Lava again.  Once I tackle that, I’ll do post the pictures to show the difference!

So, to recap really quickly;

THE LESSONS I LEARNED

  1. When you paint old furniture, you don’t need to sand all the way down to the raw wood
  2.  Use an electric sander on oil-based primer to remove the awful brush strokes

THE MATERIALS I USED

What are your thoughts?  Do you have any lessons you’ve learned in painting furniture?  I’d love to hear from you!  Leave a comment below and tell me about your experience!