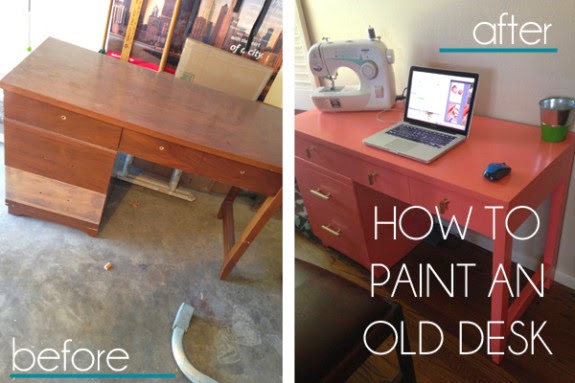
Nick and I went from a 700 square foot condo to a 1500 square foot house. In doubling our square footage, we sure had a lot of furniture voids. One of those voids happened to be a desk for me. Trying to pinch our pennies, we’ve spent a lot of time on Craigslist as a means to fulfill our furniture needs. I stumbled across the perfect desk… old, wooden, and $30. All the while, I had this desk over at Sarah M. Dorsey Designs as my inspiration and I couldn’t wait to dive in, transforming my own desk.


The original hardware.

I sanded the heck out of the desk, removing almost all of the original stain with our random orbit sander and medium-grit sand paper. My arm felt wobbly for days afterward. (Okay, I’m exaggerating a little bit, but this definitely fatigued my hand and arm!) After doing so much sanding, I learned that I didn’t need to strip it down as much as I had since I would be painting the desk instead of staining it. If you plan on staining any wood furniture, you’ll want to remove all of the existing stain by sanding it down to the bare wood. If you are painting wood furniture, a good once-over with an electric sander will rough up the stain enough to give the primer and paint something to stick to. (Just one of the lessons I learned.)

Once I had the desk completely sanded down, I used liquid deglosser to clean off the sanding debris. This is a step you can actually do in the beginning before you sand to reduce the amount of sanding needed (if any), but I did it after I sanded to help clear off the saw dust, as I just mentioned. Either way, I think is fine, but I’ll let you know if I learn something different!
The next step is to prime your furniture. I used Kilz Original Low Odor, which is an oil based primer. On the plus side, the oil-based primer is going to stick to the surface really well. On the down side, oil-based primer is a pain to clean up (aka, if you get any on you, it will likely be on your for 4 or 5 days before it completely washes off) and it isn’t particularly great at self leveling. In other words, you will see the brush strokes like crazy! After painting my desk, I have since switch primers to Insl-x Stix primer, which is an acrylic-urethane primer. Stix (for short) cleans up with water and is self leveling. While it costs twice as muck as the Kilz, I think it is well worth the cost!

If you use an oil-based primer, I definitely recommend sanding your desk down (and more specifically, I’d recommend using an electric sander with a fine-grit sand paper) once the primer dries. Be sure to check your can of primer for drying time! I hand-sanded the primer on my desk and went straight into painting and then very quickly regretted not using the electric sander instead. The brush strokes from the primer didn’t go away as much as I wanted. Once you do a light sanding to remove any excess brush strokes, use a microfiber cloth to clean off the dust.

Now comes the fun part!! Painting! I decided to use the same color as my inspiration desk, Behr’s Cool Lava, for the exterior, however, instead of using Behr paint, I choseBenjamin Moore Advance in High Gloss. Inside the drawers, I used Benjamin Moore White Dove.


I’m typically a rather frugal person, but I quickly learned that using high-quality paint is TOTALLY worth the extra money. I don’t have experience with Sherwin Williams or other high-end paints, so I can’t really comment there as of yet, but from my experience with Benjamin Moore, the paint levels out really nicely and creates a durable, superior finish. The Advance line is specifically made for woodwork, so it’s perfect for a desk. Some other spots in the house where you might consider using Benjamin Moore Advance paint include trim, doors, and cabinetry.

You have to be a bit patient with Benjamin Moore Advance since it requires 16 hours of drying time in between each coat! Talk about torture! But good things come to those who wait, right?! A small foam roller is great for applying the paint in this sort of application. You will see little air bubbles from the foam roller right as you apply the paint, but if you use a good quality paint, those will level themselves right now.


I did two coats of paint on my desk and let it rest for a few days before moving onto the finishing touches… the hardware. (Actually, it was mostly waiting for my hardware to arrive in the mail.)

So the hardware… I wasn’t a huge fan of the hardware that was originally on the desk. I really liked the look of the brass hardware on my inspiration desk and then I saw this kitchen redesign over on One Kings Lane. Oh man, I had to have those Lewis Dolin Bar pulls and knobs! Well, lo and behold, those awesome pulls and knobs in brass were on back order… everywhere. I contacted Mr. Dolin himself and he confirmed that I wasn’t going to be able to find them in stores or online for two and a half more weeks. Ugh, the torture! I ended up placing my order online and let the days tick by, but be sure, I was checking the status of my order every day to see if, by chance, they shipped out early. No dice. They finally arrived and I screwed them in that same day to finish out my desk.

The brush marks from the primer are driving me crazy, so I plan to do a quick sanding on the top of the desk down and repainting it with the Cool Lava again. Once I tackle that, I’ll do post the pictures to show the difference!

So, to recap really quickly;
THE LESSONS I LEARNED
- When you paint old furniture, you don’t need to sand all the way down to the raw wood
- Use an electric sander on oil-based primer to remove the awful brush strokes
THE MATERIALS I USED
- A random-orbit sander (this is the exact one we own) with both medium- and fine-grit sand paper
- Crown Liquid Deglosser
- Whizz Foam Mini Paint Roller
- Kilz Odorless Primer…. but I recommend Insl-x Stix Primer for a cleaner, more professional look
- Benjamin Moore Advance Paint in Berh’s Cool Lava and Benjamin Moore’s White Dove (both in a High Gloss finish)
- Paint brushes for the priming and to get in the nooks and crannies when painting where the foam roller couldn’t get
- Lewis Dolin Bar knobs and pulls (3″ on-center pulls and brushed brass finish for both pulls and knobs, to be specific)
What are your thoughts? Do you have any lessons you’ve learned in painting furniture? I’d love to hear from you! Leave a comment below and tell me about your experience!

No comments:
Post a Comment